
K Series Push Button Function Settings
|
More than the standard “normal” function, this software we provide compatible with Windows OS can bring your remote controller to the utmost.
We collect most possible industrial applications and make your remote controller completely meet your demands through using this software to design functions. SAGA1 PLL series:
Function setting (for SAGK1-K1, K2, K3, K4): 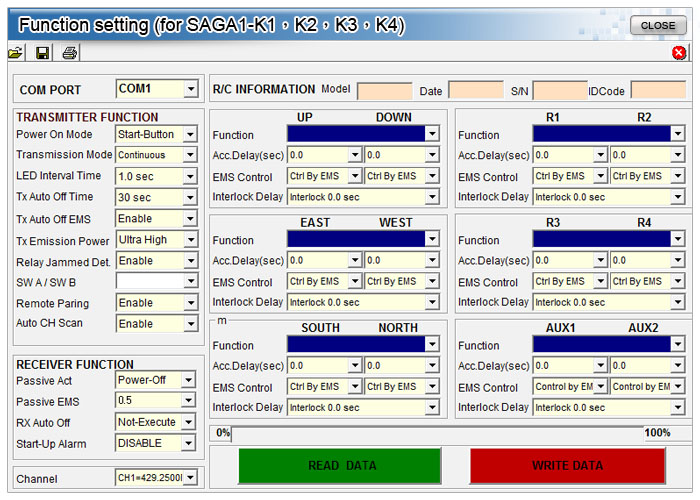 |
 |
K Series Push Button Function Settings
The information below is taken from the “K Series Advanced User Manual”. It is presented here to provide some useful term definitions and is presented here for “information only”. This material is not designed to replace or supercede the information in the manual itself.
Normal Momentary (Default)
When the push button is pressed and held down, the relative relay is “on”. When the push button is released, the relative relay is “off” .
Toggle (Maintained)
To press the push button and release once for “on” and re-press and release for “off”, back and forth, is called a “Toggle”. For instant, the Toggle function is usually used as a switch to control lighting.
ON / OFF
Two relative push buttons are set to respectively control the same relay. If a push button set as “on” is pressed then released, the relay remains in conduction. To de-energize the relay, press the push button set as “off”. This is like turning the switch of a water pump ON or OFF by the respectively push buttons.
Interlock
If the motions cannot operate simultaneously, they are “Interlocked”, e.g. UP and DOWN push buttons are typically “Interlocked”.
Non-Interlock
If the motions are allowed to operate simultaneously, “non-interlock” as been selected.
Interlock Delay Time
The interval delay time is the time before next motion is valid. For example, to prevent brake damage, there is an interval time before next motion e.g.: “UP - (Interval Delay) - Down”.
Magnetic ON / OFF
Two relative push buttons are set to respectively control the same relay. If a push button set as “Magnetic ON” is pressed then released, the relay remains in conduction. But, when an operator would like to terminate this function, the push button (set as “Magnetic On”) has to be pressed again and held before pressing the push button “Magnetic OFF”. This function is mainly used on electromagnetic device.
Inching
Once the push button is pressed, the relative relay will be activated within some certain period of time to operate a short but precise movement. Inching 1: Press and release the “START” button first, then press the motion push button (Inching function was active). To terminate the Inching function, press the “START” button again.
Inching 2: Press and hold “START” button then press motion push button to perform the inching motion.
Inching Time
Inching time is used in the situation above to control the time a relative relay activates to accomplish a precise movement only within a short-period time.
Acceleration Delay
This function sets the time interval before the acceleration relay is activated (i.e.: a conduction-delayed time before the acceleration relay). It adds duration between two events to prevent cranes from immediately running to the highest speed and causing damage to the motors.
Dual Motor (Make Before Break Four-Wire Control)
For the 2-step button models, only one relay is active at a time. In other words, press UP 1st step button, the “UP1S” relay turns on. Press deep to the 2nd step and the “UP2S” relay turns on, while the “UP1S” relay turns off. There are 2 modes for Dual Motor as below.
Dual Motors (1): When push button is released from 2nd step to neutral position. The 1st step relay will turns on for very short time till the push button is totally released.
Dual Motors (2): The 1st step relay is not active (or is bypassed) when push button is released from 2nd step to the neutral position.
Synthesis
In synthesis mode, the button functions as normal button. But when two relative buttons pressed simultaneously, it works as “toggle” function. Note: Synthesis only available on 2-step button models.
Power On Mode
(1) Start Button: The receiver will “Power-On” as the key is turned from “off” to “on” position. Then press the “START” button
(2) Power On with Password: This function is used to set a restriction for unauthorized operators. A password sequence will be required before turning the transmitter on. Select 4 push buttons as password from UP/DOWN, EAST/WEST, and NORTH/SOUTH. For example, press the push buttons in accordance with the sequential number (4 digits), for example: Up - Up - Down - Up.Appendix I K Series Push Button Function Settings
Transmission Mode
(1) Continuous Transmitting Mode: Transmitter will continuously transmit signal during “Power-On”.
(2) Non-continuous Transmitting Mode: After “Power-On”, the transmitter will transmit signal only as the push button is pressed. This mode can save the power of transmitter.
TX (Transmitter) Auto-Off Time
Transmitter will turn off the power automatically after a certain time has passed without any operations being performed.
Note: TX Auto-Off Time function is only available when “continuous transmitting mode” has being selected. TX Auto-Off EMS (Emergency Mushroom Stop)
Sets the transmitter to transmit the EMS signal to switch off the receiver before transmitter turns off automatically.
Note: TX Auto-Off EMS function is only available when “continuous transmitting mode” has being selected.
LED Interval Time
LED Interval (Inter.) Time means TX power indicator will lighten and vanish between an interval time. For instance, the time showing on the program indicates the duration of interval time.
Passive EMS
The function of “Passive EMS” is used to set the duration of “Interference Neglected Time”. It is able to be set dependant upon environment conditions, which means the duration of practical interference time is less than the duration of “Interference Neglected Time”, in which case the remote controller will continuous perform its function to make cranes keep moving.
Passive Act
The function of “Passive Act” is used to set the reaction of receiver when the duration of interference is more than “Interference Neglected Time”.
Relay Off
Means the Main Relay is still on, but the other relays with the function of “Normal” are all de-energized. It not necessary to recommence the procedure of “Power-On” again to continuously operate.
Power-Off
Means the Main Relay and all of the other relays with the function of Normal” and “Control by EMS” are going to de-energize and it is essential to recommence the procedures of “Power-On” again to continuously operate.
RX (Receiver) Auto-Off
The Receiver Main Relay will power off and de-energize automatically without receiving any signal within a period of time from Transmitter. Normally, when “non-continuous transmitting” mode has been selected and RX Auto-Off will be active in case operators forget to press EMS after completing the task.
Start-Up / Shut-off Alarm
Alarm sounds for two seconds when receiver turns on and off. Select enable to active this function or disable to cancel.
TX Emission PWR (Power)
TX Emission PWR offers eight different power level settings, which will provide operating ranges between the minimum or 65 feet (20m) and the maximum 500 Meters and minimum of 20 meters. Note: The actual operating range will depend on the actual circumstances during operation.
Relay Jammed Detect
If the relay is detected as “jammed”, the main relay will de-energize for safety.
Note: Relay Jammed Detect is only available for UP/DOWN, EAST/WEST, SOUTH/ NORTH relays in “Normal” function.
Remote Pairing
If the Remote Pairing setting is set at “enable”, the remote pairing function is effective. For standard operating procedures, please refer Appendix II, “Special Function Setting”. To cancel remote pairing function, select “disable”.
Manual Channel Scan
If “Manual CH Scan” is selected as “enable”, manual channel scan is effective. For standard operating procedures, please refer Appendix II, “Special Function Setting”. To cancel Manual CH Scan function, select “disable”.
Channel
Operators can set frequency among CH1-CH70. There are 70 channels available.